Congratulations
We are done with the setup of Admin Panel.
Now open your domain url in the browser to run the website.
The Laravel structure has a couple of framework prerequisites.You should ensure your server meets the accompanying necessities:
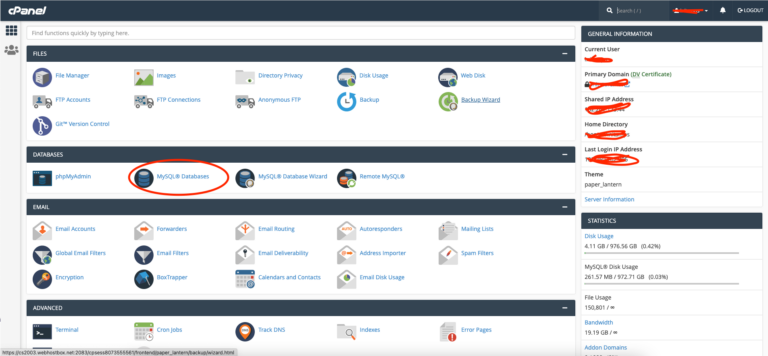
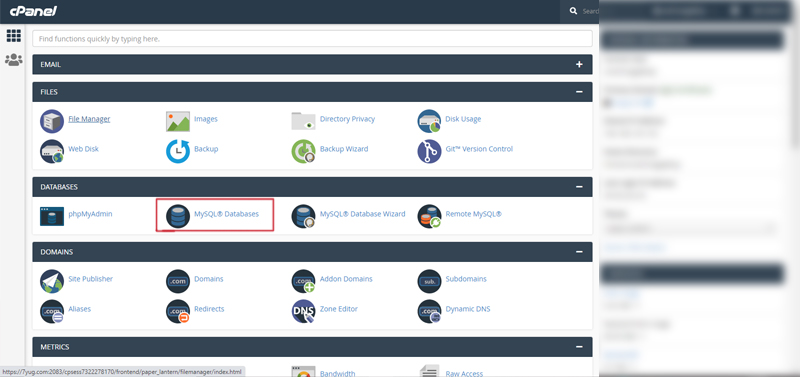
1. To setup the database of admin panel on the server, Login into the cPanel with your credentials on
2. After a successful login, click on “MySQL Databases” and create a database.
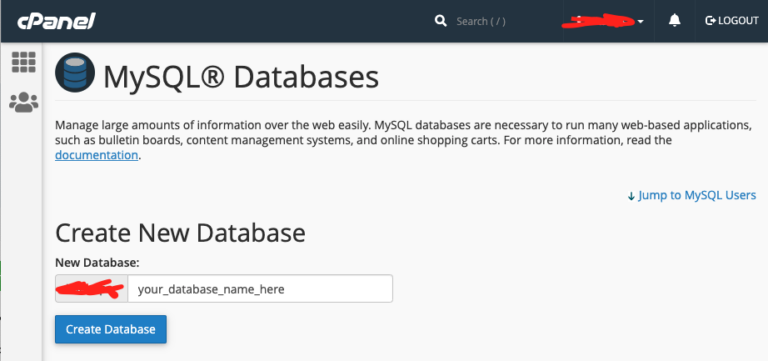
3. Enter a database name (like fda_admin) and click on create database button.
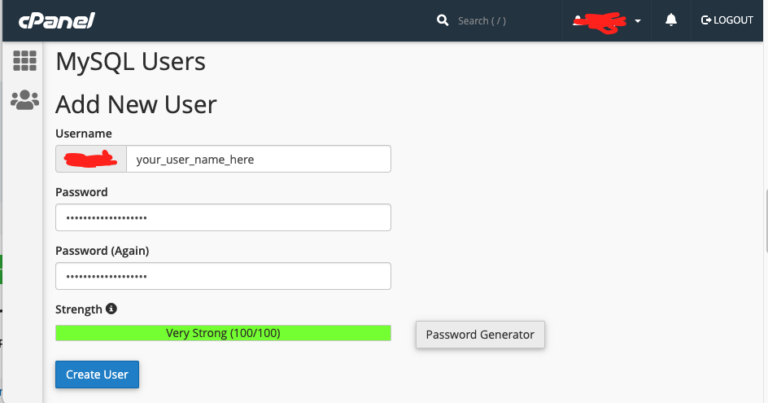
4. Scroll down on the same page and click on MySQL Users to create a user for the database.
Geanerate a strong password and save it securely somewhere. We will use the Database name, Database Username and Password ahed. Make sure to save it.
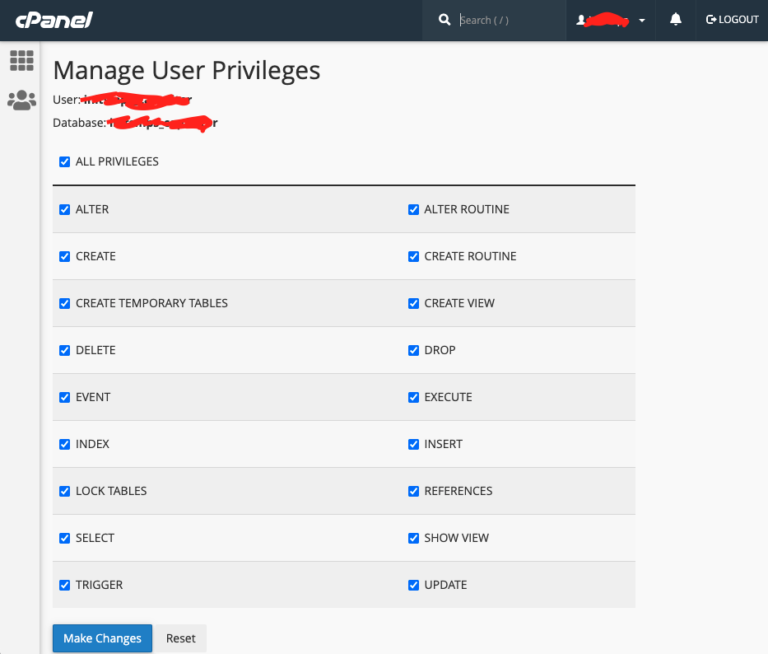
5. Now we need to assign the user to the Database.
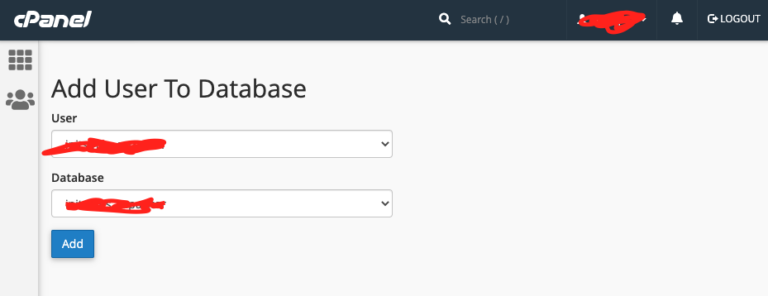
6. After clicking the Add button a new page will be presented.
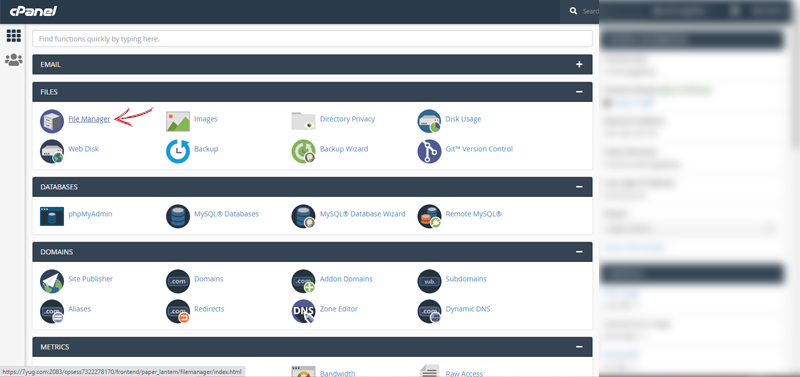
After making the database and assigning user to it, we need to upload out admin panel files to the server file manages and integrate with the Database.
Here we will need the downloaded admin zip file.
Double Click on the public_html folder.
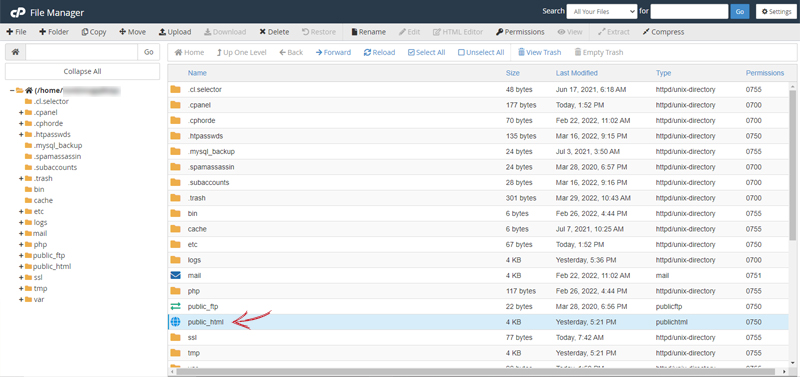
Now you are in the public_html directory
Click on the upload option.
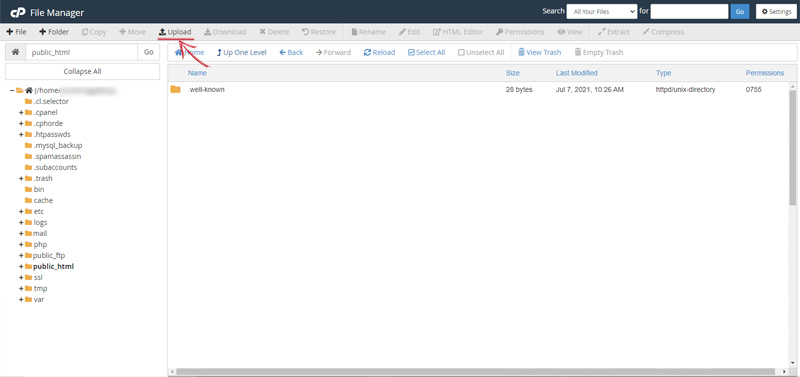
A new tab will be opened.
Now on your computer open the Downloaded zip file and make zip archive of the admin folder
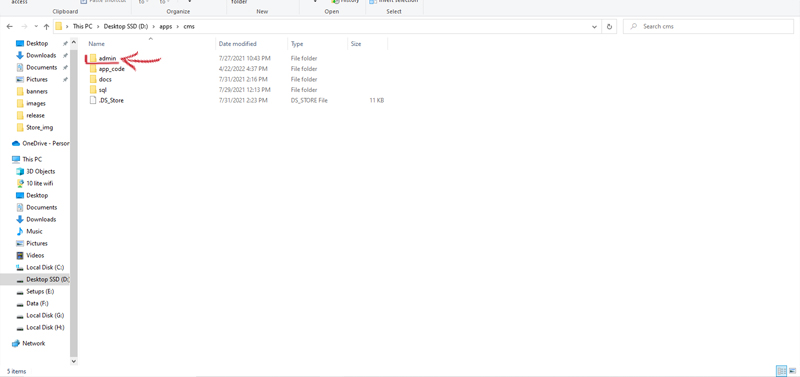
After making the zip file of the admin folder
Come back to the browser and upload the admin.zip to the server
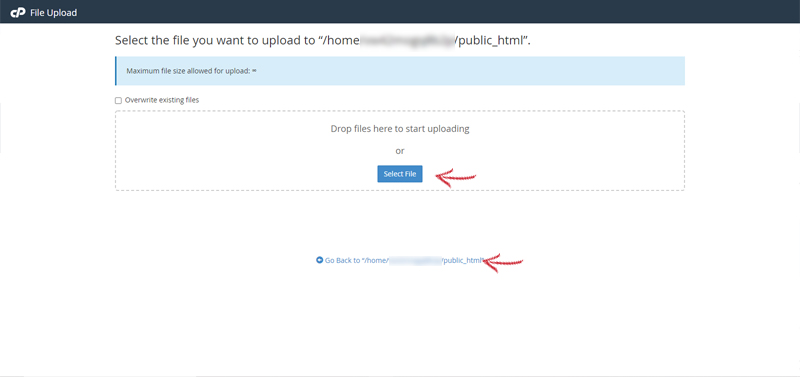
After uploading the file click on the Go Back to “/home/user/public_html” link on the same page
This will let you in to the public_html folder
(or you can go to cPanel>File Manager>public_html folder)
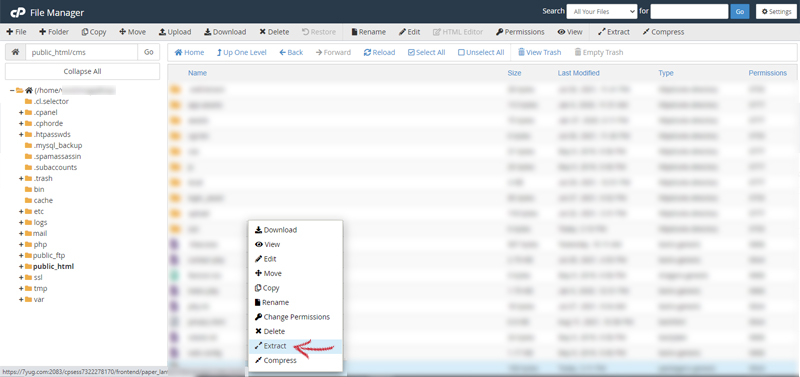
Click on the Reload option from top menu
Now you will se that uploaded admin.zip fie
Right Click on that and click on extract
This will take less than a minute.
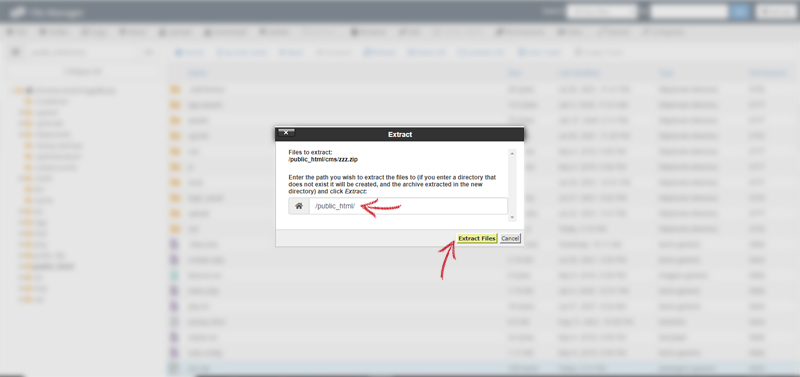
Once the zip is extracted click on close.
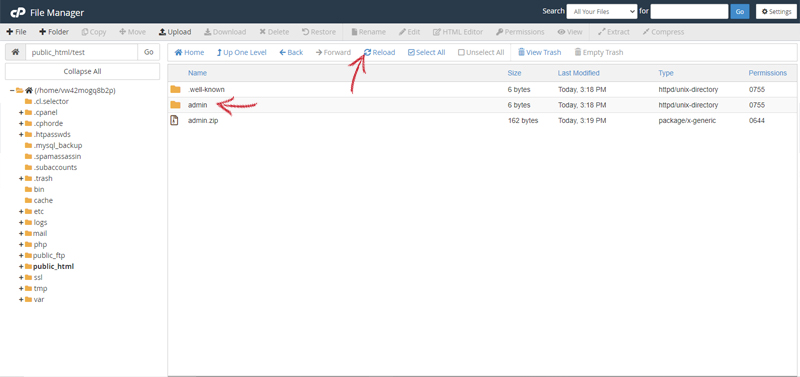
Click on the Reload option from top menu
You will see admin folder
Double click on that to open
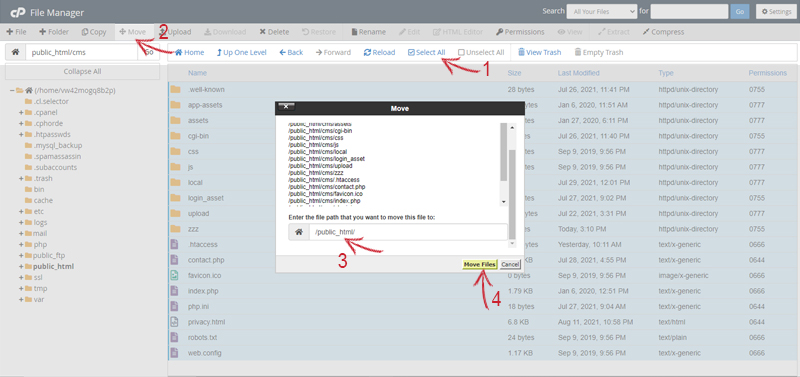
Now you will se number on files and folders
Click on the Select All option from the top menu
After all the filse selected, click on the Move option from the top menu
Now make sure the path under the box is /public_html/
click on Move button
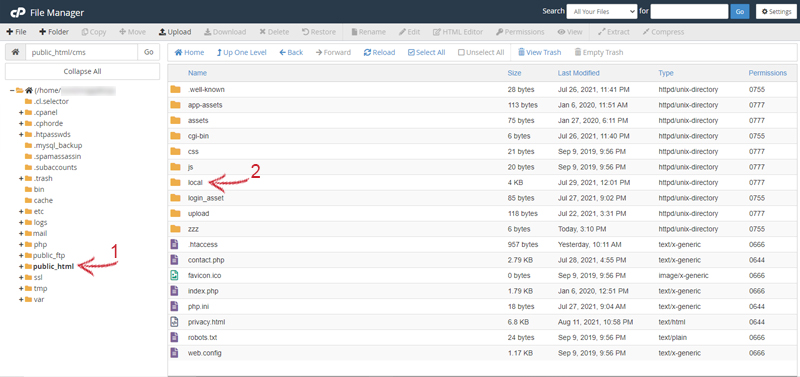
Now Click on the public_html option from the left menu
Now Double Click on the local folder
Right click on the .env file
click on edit option
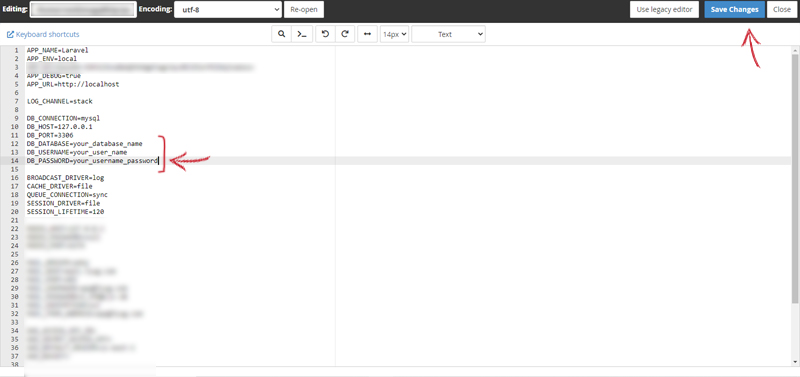
Enter the Database Name, Username, Password that we have saved already somewhere.
After enterning the database details click on the save option on the top.
We are almost done only one thing (importing database) is remaining to use the app.
1. To import the sql file, Login into the cPanel with your credentials
2. After a successful login, click on phpMyAdmin and create a database.
A new tab will be opened.
1. Click on your username from the right panel.
2. Click on the database name from the right panel.
3. Click on the import button from the top options.
4. Click on the choose file button from the top options.
Now open the downloaded folder on your computer. Open the sql folder and you will see a app_name.sql (example name) file.
import this .sql file to phpMyadmin on the server
We are done with the setup of Admin Panel.
Now open your domain url in the browser to run the website.
Our mobile apps are built in ionic framework over angular.
It is an open source mobile toolkit for building high quality, cross-platform native and web app experiences.
To make changes and build our app we need to install the ionic cli and Angular in our local machine.
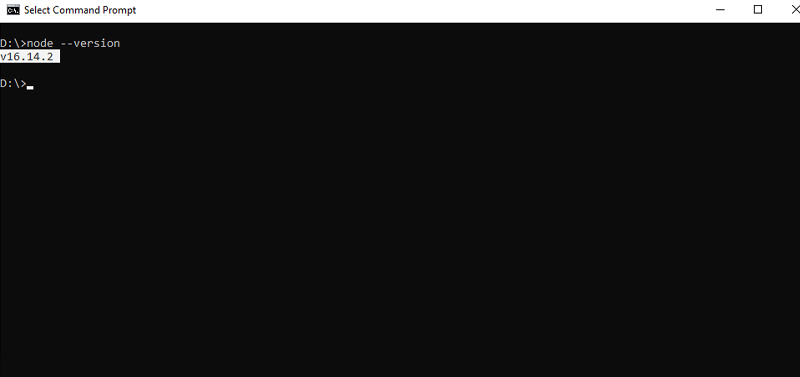
Before proceeding we need to make sure that Node.js is installed in our system.
To install Node.js follow this link and download the installer for your system.
After downloading the installer open and install it by hitting the next next buttons.
After installing successfully, open your terminal or command prompt and enter this command node --version
If it is showing a version instead of an error, it is installed successfully.
Now we need to install ionic cli
In the terminal run this command npm install -g @ionic/cli
This will install the ionic cli in your system.
Chek the installation by running this command in your terminal ionic --version

After installing the Node.js and Ionic Cli we need to install Angular Cli.
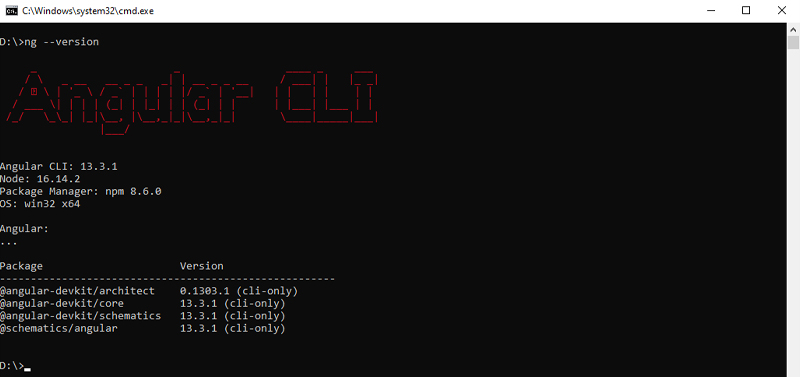
Run this command in your terminal npm install -g @angular/cli
Chek the installation by running this command in your terminal ng --version
Android Studio is the IDE for creating native Android apps. It includes the Android SDK, which will need to be configured for use in the command line.
We will build the apps using the Android sdk.
Follow this link to setup Android sdk
We have used Google Maps in the Delivery and User app for getting users location, live tracking of orders and other features.
In order to use google maps in our app, we must have google maps keys with the following permissions
You can find and create keys at google cloud console visit this https://console.cloud.google.com/google/maps-apis/start?pli=1
Create A new project with your app name and in the api section enable all the api's mentioned above.
Get the Api key from the Credentials Section and save it somewhere.
Your Api key will look like this AIzaSyDt_NAbS47BDdoiwYOakKdik7RUuv9usrPrtuJg (example key)
After we have enabled all the mentioned api's we need to integrate this api key to our User and Delivery App.
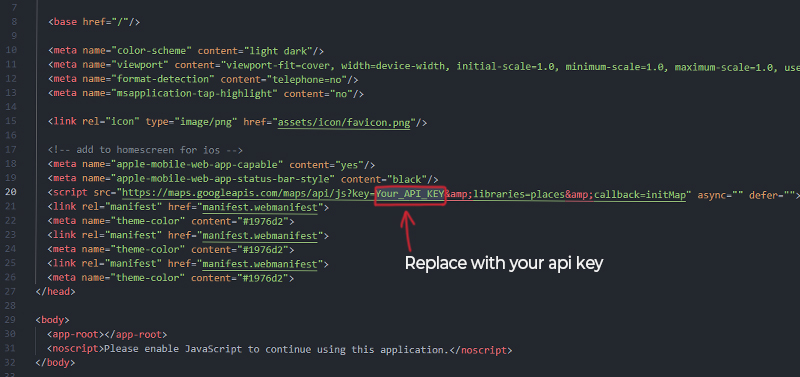
1. Go to the project folder fda/app_code/user/src/index.html
2. Open the index.html in the code editor and replace your Api Key as mentioned below.
Save the files after making changing them
3. Do the same with Delivery App.
Go to folder fda/app_code/delivery/src/index.html and replace the key.
We are done with the setup on Google Map Api in our User and Delivery App.
Now we need to integrate the backend api's to our apps
Lets do it in the User app first.
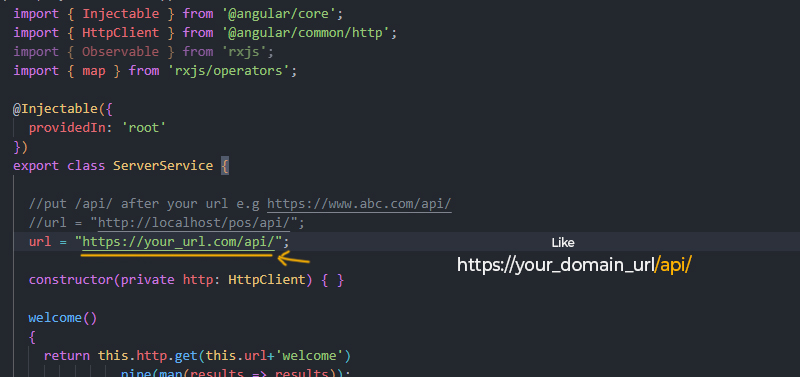
Go to fda/app_code/user/src/app/service/server.service.ts
Change the api url with your url with a suffix /api/ as mentioned below
Do the same in the Delivery App in fda/app_code/delivery/src/app/service/server.service.ts
Do the same in the Store App in fda/app_code/store/src/app/service/server.service.ts
Save the files after making changing them
After setting up this in all our apps we are done with the setup of api's in our app.
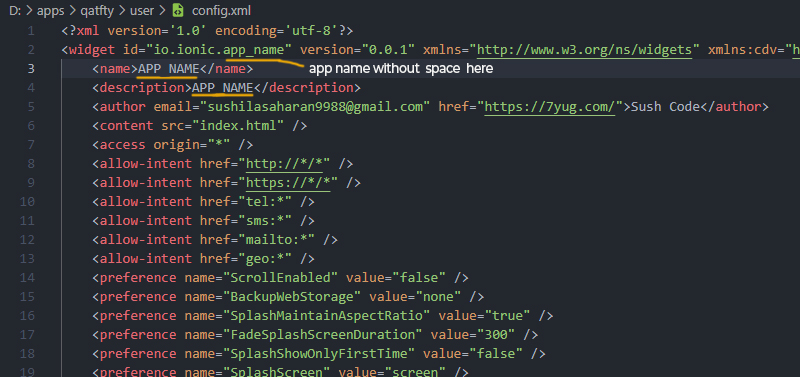
Change the Widget id, App Name, Description in fda/app_code/user/config.xml as mentioned below.
Your widget id will be like this io.starter.fda_user (this needs to be without space)
Your name will be like this FDA User
Your description will be like this FDA User App
1. open this folder in your terminal fda/app_code/user/
2. open this folder in your terminal npm install
2. Run this command in the termninal ionic cordova platform add android
This will install android platform for anroid in the user app
n3. Now we need to generate App Icon and Splashscreen for our app.
Copy your app icon and splashscreen in fda/app_code/user/resources
The app icon name: icon.png size: 1024X1024px format: .png should be this.
The app splashscreen name: splash.png size: 2732X2732px format: .png should be this.
2. Run this command in the termninal ionic cordova resources android
If this command giving an error run the command again.
4. Now run this command to build apk ionic cordova build android --prod --release
You can find this apk with name app-release-unsigned.apk in fda/app_code/user/platforms/android/app/build/outputs/apk/release
5. copy this app-release-unsigned.apk to fda/app_code/user/
6. After placing this apk to the user folder wee need to generate a keystore file.
7. Run this command in the terminal keytool -genkey -v -keystore my-release-key.keystore -alias alias_name -keyalg RSA -keysize 2048 -validity 10000
8. Enter the required fields and passwords make sure to remember this.We will user these details in publishing the apk.
9. Now wee need to sign our apk
10.Run this command jarsigner -verbose -sigalg SHA1withRSA -digestalg SHA1 -keystore my-release-key.keystore app-release-unsigned.apk alias_name
Your apk will be signed.
11. Go to fda/app_code/user/app-release-unsigned.apk and rename this with app name like fda-user.apk
Now You can test this apk by sending and installing in your android device.
Do the same thing from Step 1 with same commands for store and delivery apps.
1. After building the apk open this folder in your terminal fda/app_code/user/
2. Run this command ng add @angular/pwa
3. After this run this command ionic build --prod
Now You can find the user pwa with name www folder in the current directory.
For push notications in all our apps we used OneSignal Push Notificateion Service.
First go to this link https://onesignal.com/ and do signup/Login.
Click on the New App/Website
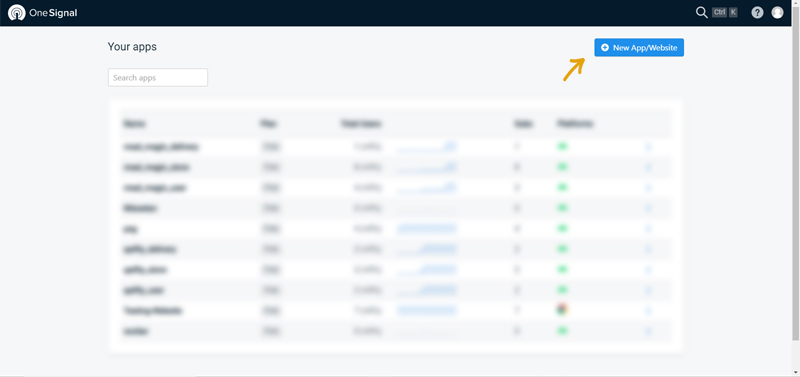
Click on the New App/Website
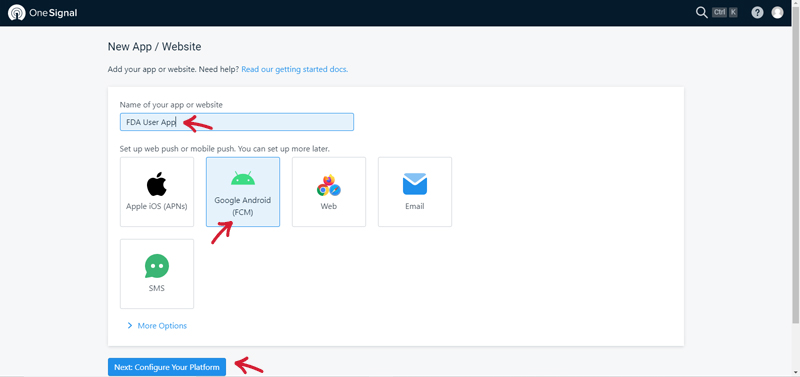
Enter the app name like FDA User App
Select the Google Android (FCM) option.
Click on the Next Button
Now wee need to enter Google Firebase Sender ID and Server Key.
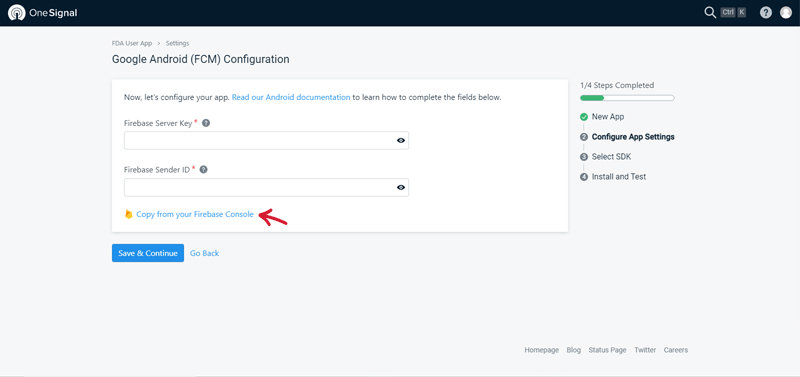
For this click on the link Copy from your Firebase Console.
Signup/Login with your google account.
Create New Project with same name like FDA User APP.
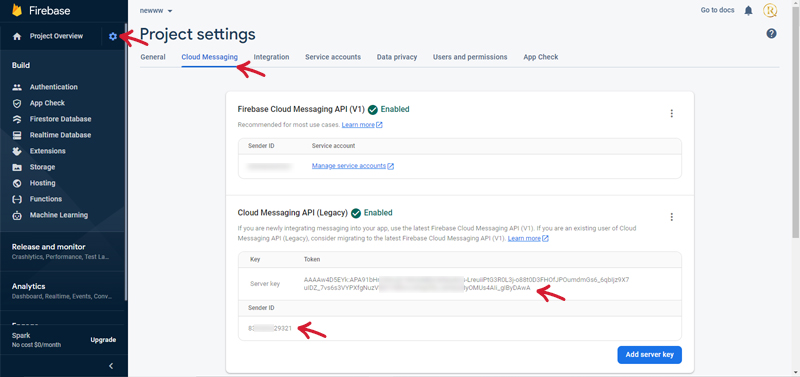
After Creating the project create on the settings icon from left panel and select Project Settings
Now click on Cloud Messaging Section from top options
Copy The Sender ID and Server Keyand paste into the Onesignal project respectively.
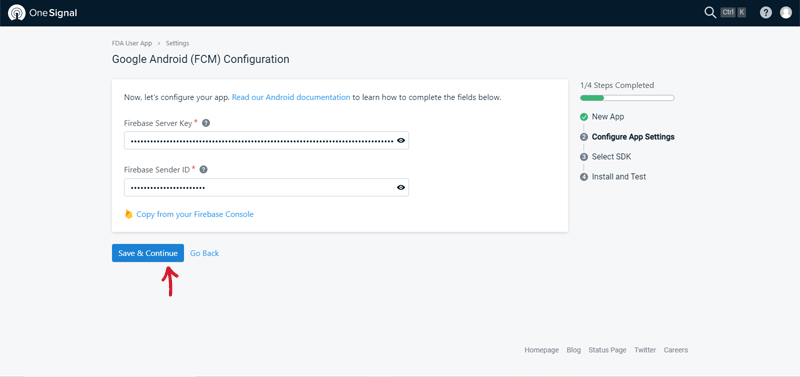
Click on save
Now Select Ionic and Save.
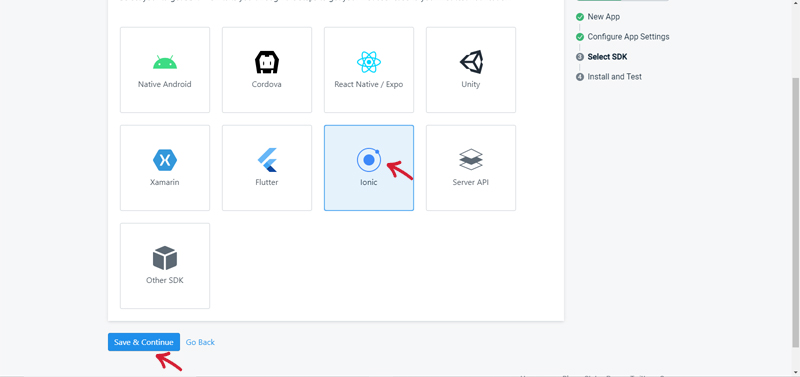
Do the same steps for Delivery and Store Apps
After doing these we have successfully created Onesignal Api's for our Apps. We will use these keys in our Admin Panel to integrate with our mobile apps.
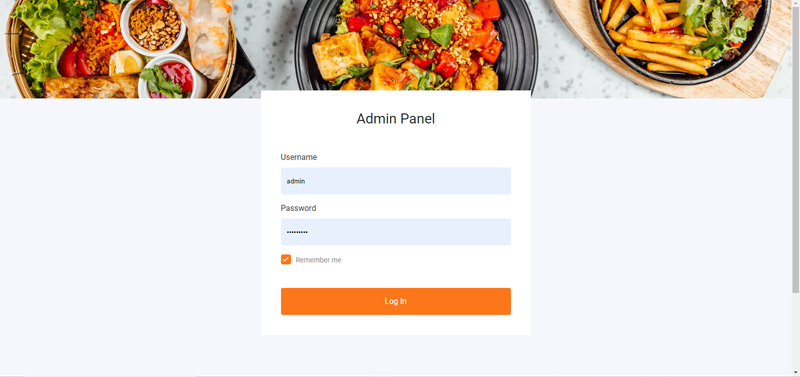
To access the admin panel, open your website url with '/login'
eg. fooddelivery.com/login
A login page will presented
The default username is: admin and the password is: google123

Now you can see the dashboard of the admin panel.
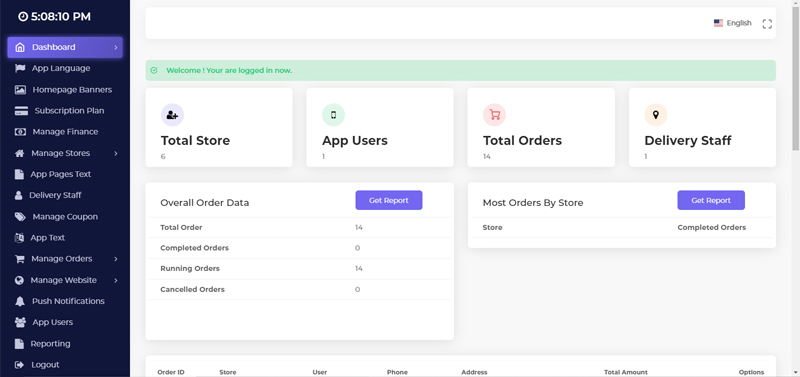
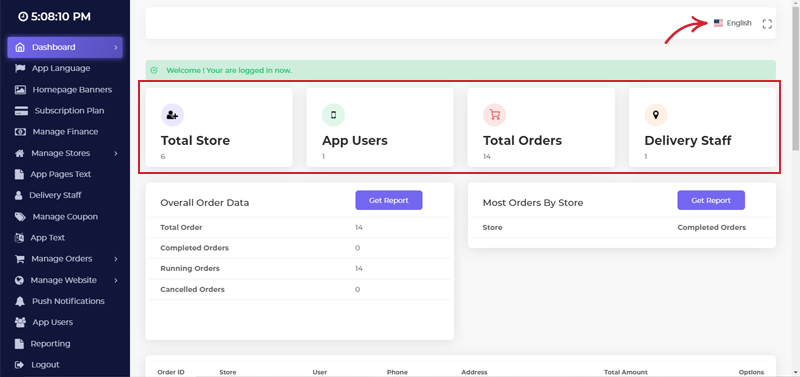
Here you can see the Total Stores, App Users, Total Orders, Delivery Staff.
you can get reports of orders and stores.
You can change the admin panel Language and can use the admin panel in fullscreen
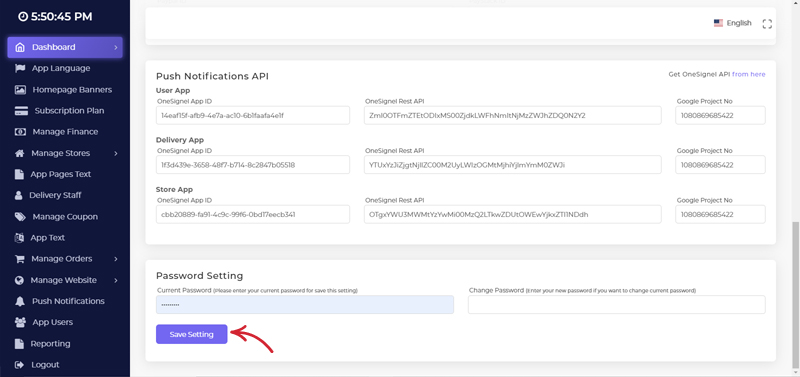
Here you can update Admin Settings, Mobile App Settings, Payment Gateways Api, Push Notification Api.
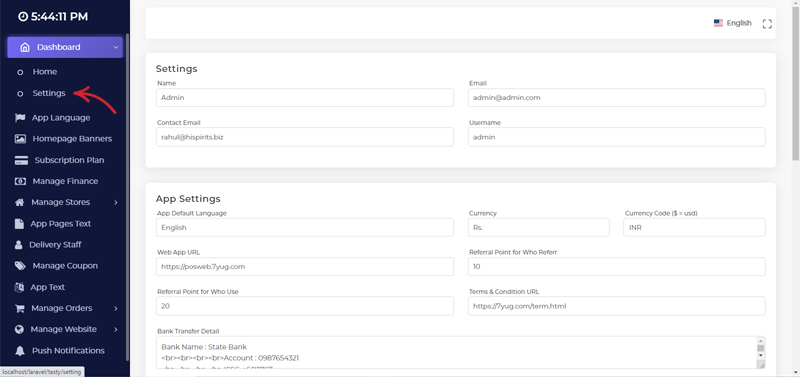
We Need to add OneSignal Api key and Firebase Sender ID to integrate our apps with push notifications.
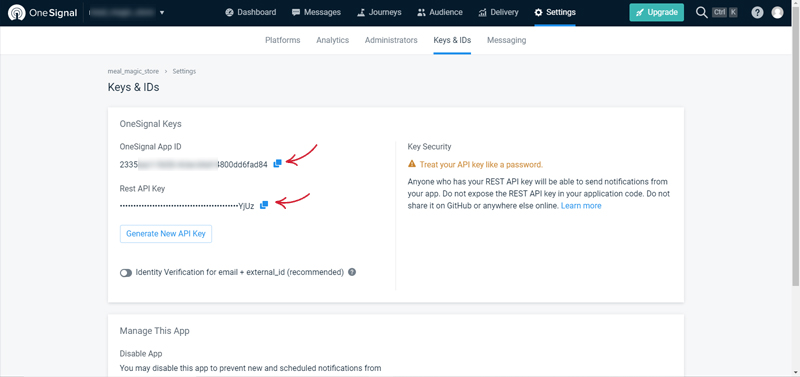
Login to your OneSignal Account https://app.onesignal.com/login
Click on your app name like fda_user
Click on Settings from top menu
Select on Keys and Ids from top menu
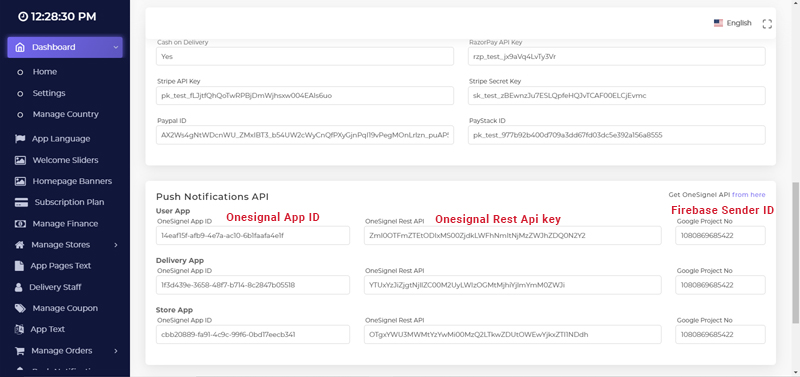
Copy the OneSignal App ID and Rest API Key and paste it to the admin panel push notifications for User App
Now we need Firebase Sender Id
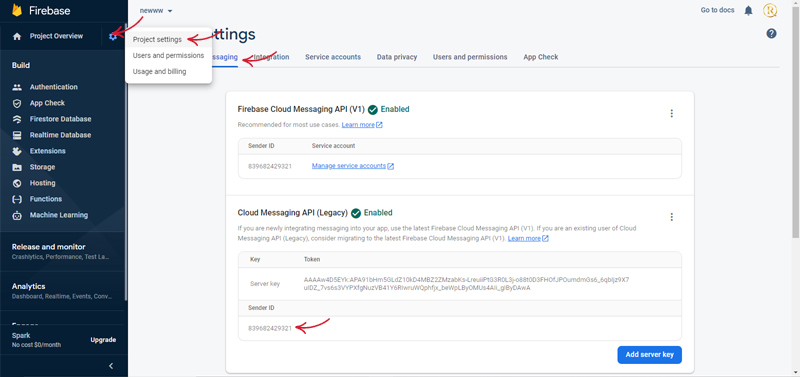
Log in to https://console.firebase.google.com/Select your project
Click on Settings>Project Settings>Cloud Messaging
Copy the Sender ID and paste it to the admin settings for user app
Do the same for the Delivery and Store App
Note: We need to create 3 projects for each in onesignal and firebase like user_app, delivery_app, store_app and we need to enter the keys of each project to the admin settings
After entering the information re-enter the current password and click on Save Button
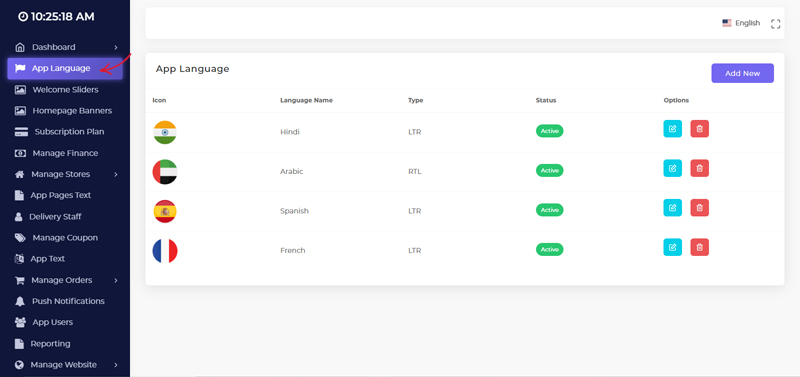
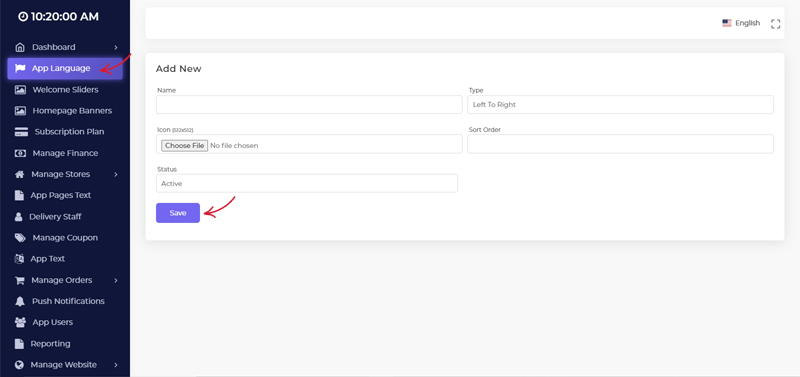
Here you can manage App Languages for the mobile apps
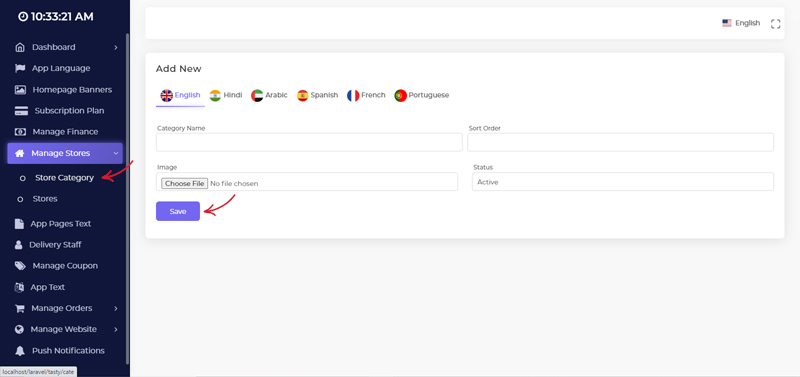
Before adding stores, we have to make categoies for them.
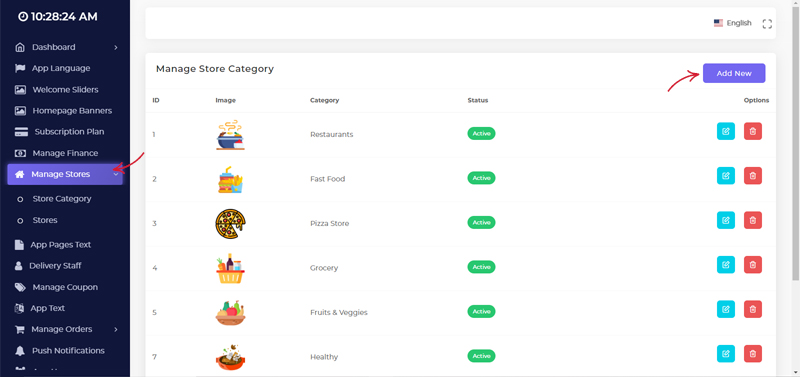
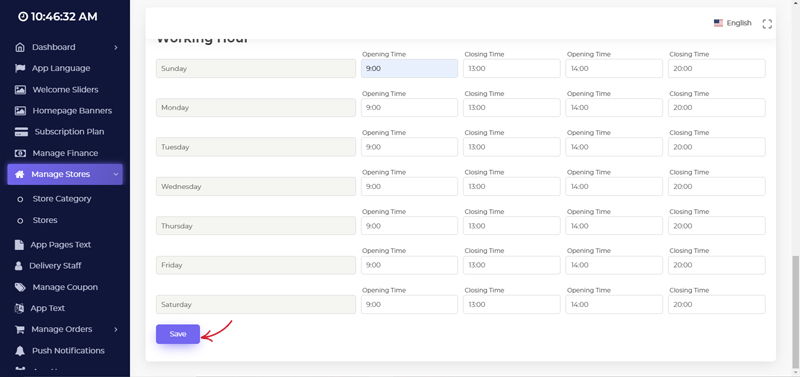
Now We can add new Stores
Click on Store > Add new
Enter the required store Details and click on Save
You can add other languages text by clicking on the languages options add the translated text and save it.
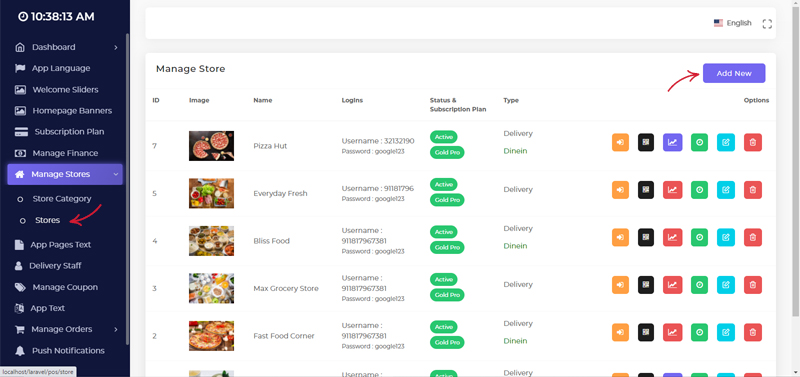

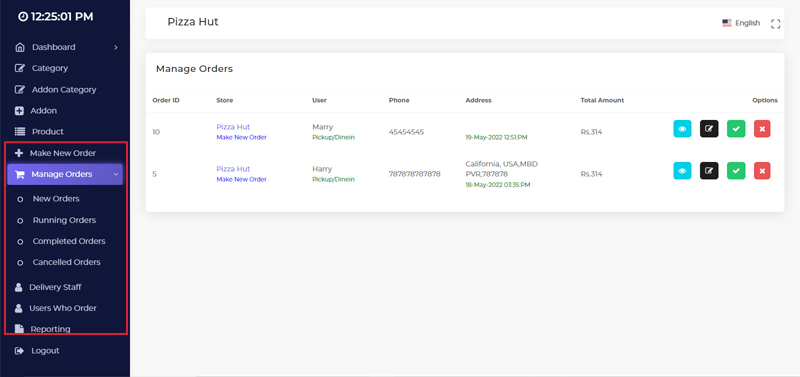
After adding stores we can manage them.
We have Multiple options here
We can Generate QR Code For that store, make the store trending, change store status, Edit,Delete.
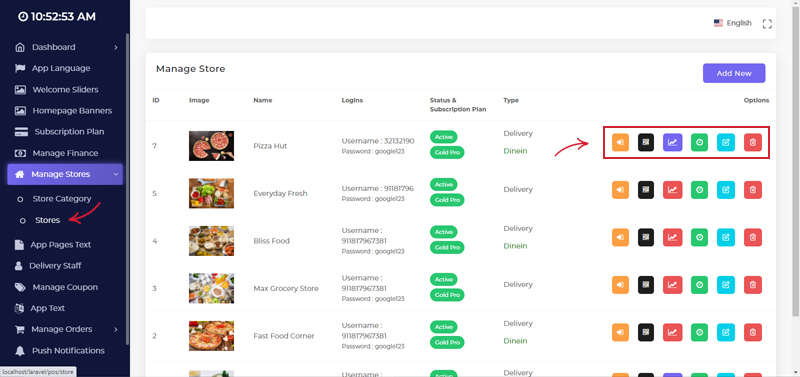
To manage a particular store we have to log in to that store
Click on the Login as Store option next to the store
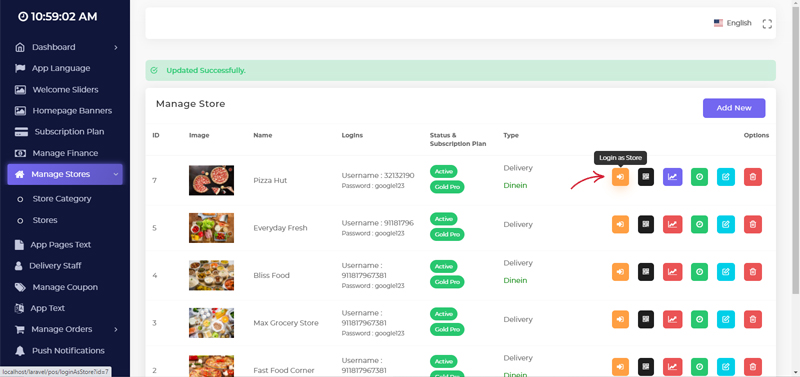
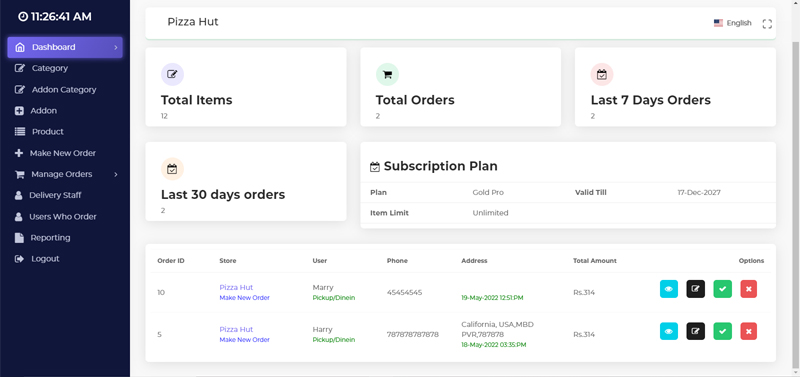
Now you can see the store's dashboard
Before adding products, we need to add Product Categories first
This Categories are only for this logged in store
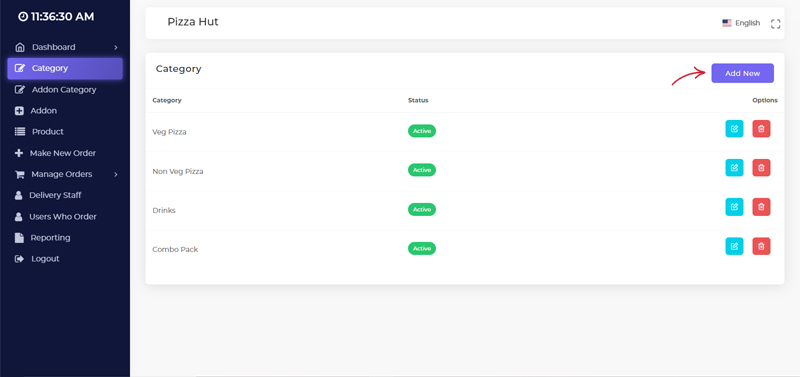
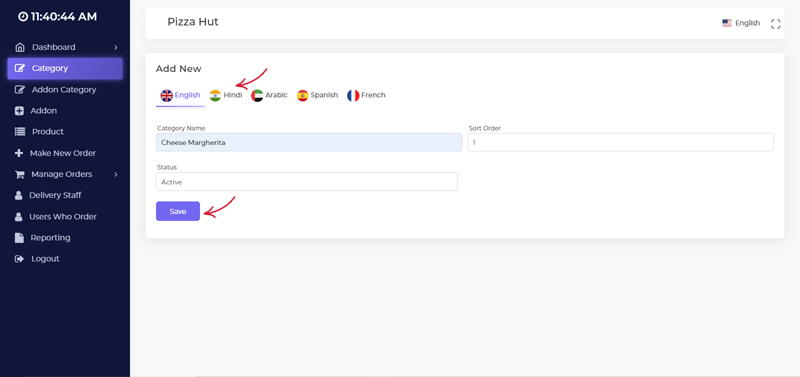
Enter the Name, Sort Order and Status
Click on save
If You have added other App Languages, make sure to update the category name in other languages as well.
After adding product categories we can add new products to the store.
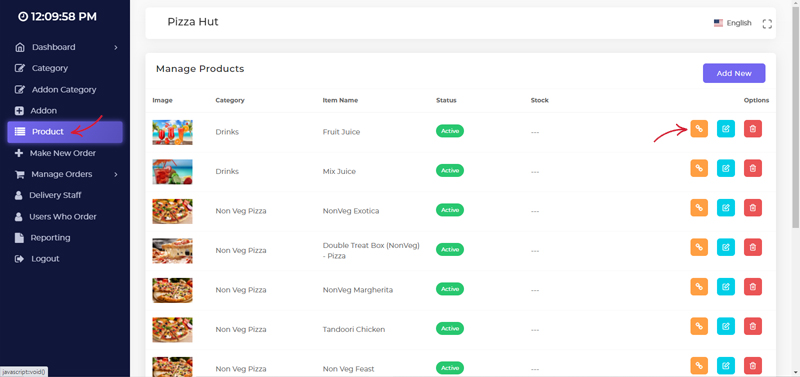
Click on the Product from left menu
Click on Add New
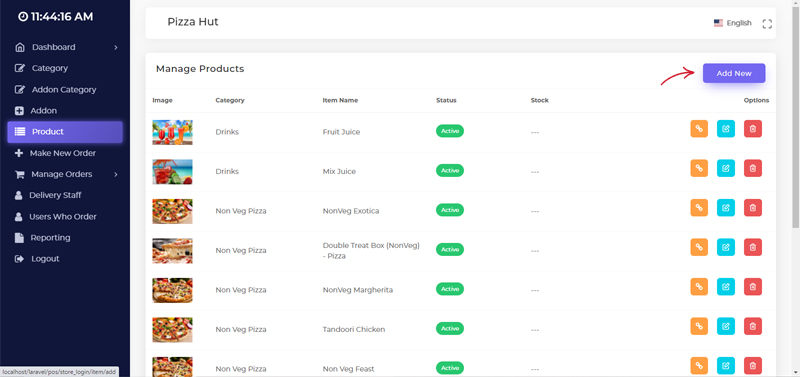
Enter the products details.
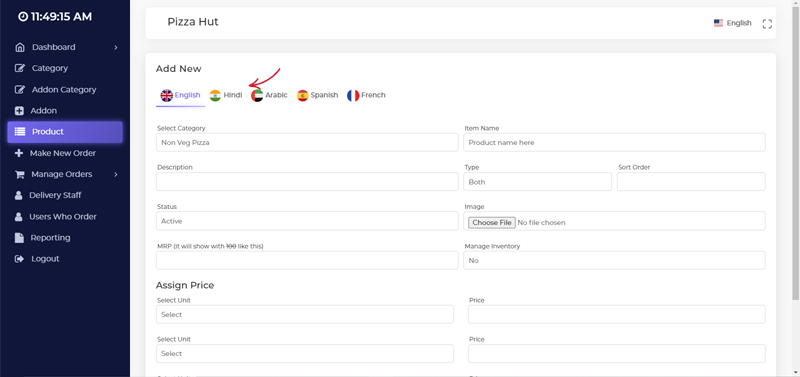
If you have other app languages, make sure to add the product basic details in other languages also.
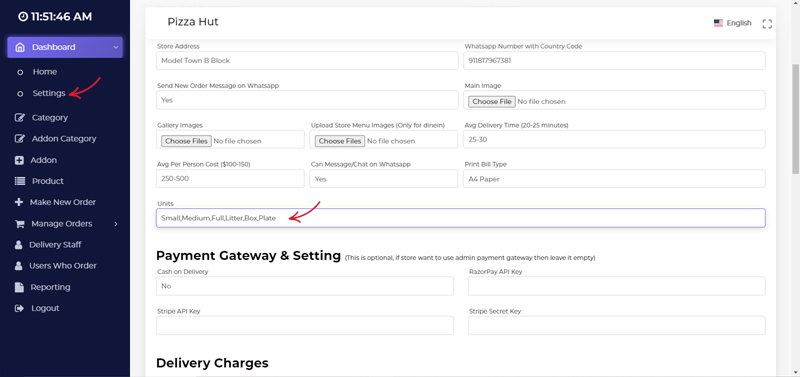
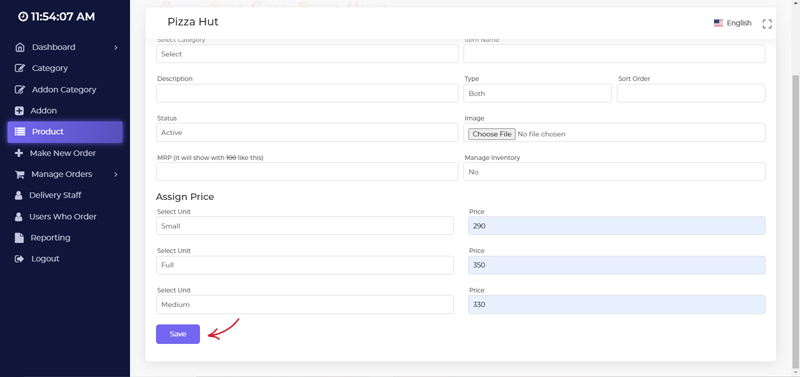
If you are not seeing the units for the products, make sure you have added the units in the store settings
Enter the required product details and click on save.
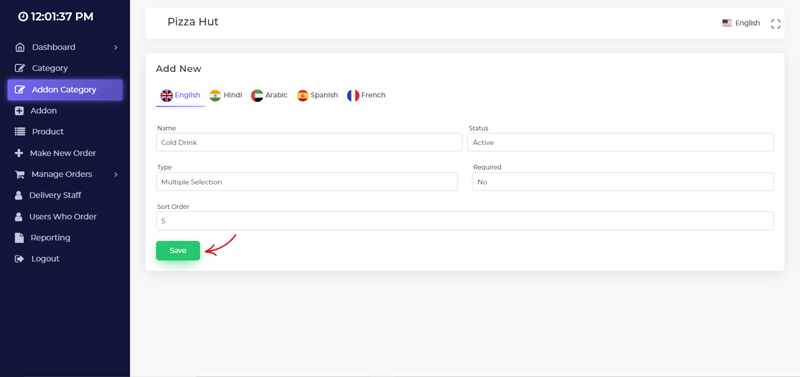
Before adding Addons to Products, we need to add addon categories and addon first.
Click on Addon Category from the left menu
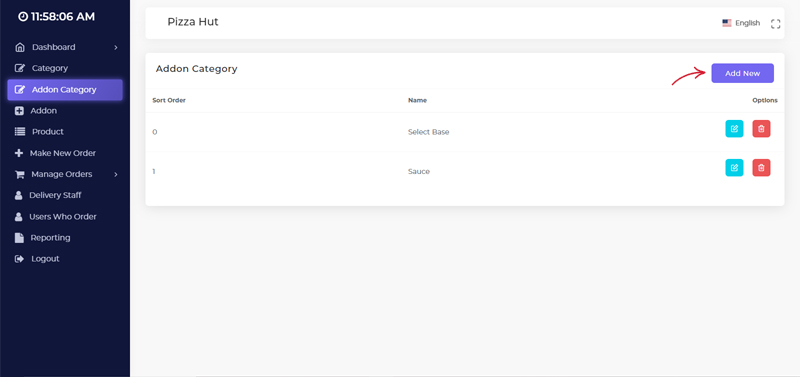
Enter the addon category name, status and sort order,type and save
Enter the addon category name in other languages also and save
After adding addon categories, we can add new addons after that we can assign them to the products
Enter the addon name, category, price and save it.
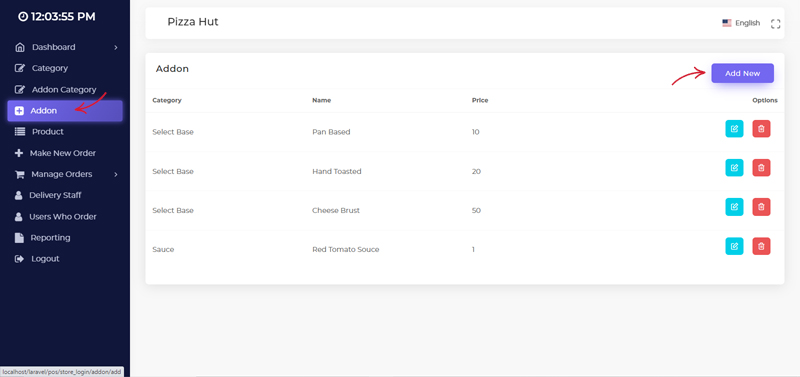
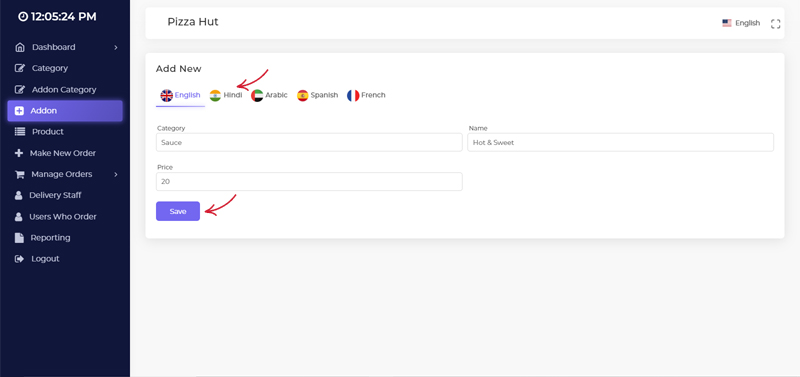
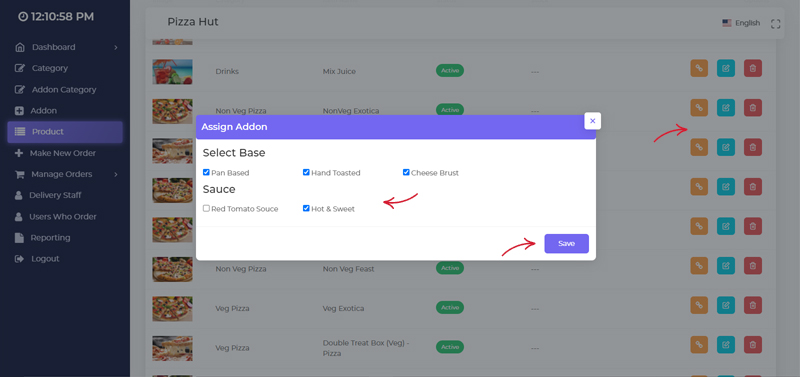
After adding addon categories, and addons we can assign them to the products
Click on the addon icon next to the product and ceck mark the addons you want to add to this product and click on save.
You can explore the other features as well they all are easy to use.